Quarantine Makeover: Living Room Edition

Welcome to the longest room makeover. According to the time stamped photos on my phone I started planning this on June 8, building the cabinets on June 30, and today it is October 4 and I just installed the cabinet doors bringing this room to a close...yikeeeeeeeeees. In the beginning of quarantine I was much more motivated but as it gets closer to the election and as more and more hellish things keep happening around the country it is a lot harder to stay focused on basically anything. Slowly but surely I finished this room though!
Andy and I's original plan for this year was to move to Wisconsin. We were going to keep a lot of things but mostly sell all of the furniture from our living room because while it's cute it's not very functional. Now that we're staying in New Orleans and definitely going to stay in the house we're currently in we want to make a real effort to transform this room into a comfy cozy and relaxing environment!
Let's look at some horrifyingly messy before photos.


So clearly there are some areas that could function better lol. Also, just know a lot of those tubs are of fabric that are not even supposed to be in the living room but truthfully were stacked there for way too long. The biggest (most expensive) issue to resolve is our couch. The one we have now I love but it has some major issues.
The pros:
LOOK AT THIS FABRIC
The cons:
The cushions are super worn down and sag in the middle. When two people sit on the couch you kind of fall into the middle.
Most of the fabric is super worn down and because it's such a unique print it's basically impossible to match the fabric to fix it up.
It's tiny and not very good for lounging to watch a movie which truly is a high priority.
The other issue is that the living room is a very small room so most couches don't fit which is why we had this baby couch in the first place. The solution is a sectional but I had very specific criteria the sectional needed to meet.
On a lot of smaller sectionals the short side doesn't have a back and instead is a chaise. I needed it to have a back because that would be the side that's against the door opening so 1. without back support we essentially wouldn't be able to use that seat and 2. it would look like the couch is "facing" the wrong direction and look odd.
No suede. Our dog Clementine has very coarse hair and she sheds a ton so getting a light colored couch in a material that doesn't attract pet hair like suede is a big factor for us.
Affordable. We are definitely willing to pay a little more for a couch right now because we know we're going to have it for a long time and want it to be super comfortable but we're not trying to get crazy here.
The short side needs to be only a two seater for it to fit in our space or be a modular couch that we can arrange however we want.
So after A LOT of internet searching we ended up going with this one, the Bronx Modular Sectional, from Target. It meets all the criteria! This specific type of couch is available from a couple of other places like Overstock and Walmart but we chose Target because we can return it in store if we didn't like it. When I originally saw it online I thought I would end up changing out the feet to something more sleek like a tapered mid century modern style. However, after receiving the couch and seeing it in the space I barely even notice them so I decided to leave them as is and save some money. Also side note, there are a lot of things with this room that I would totally change or like to do but I like the idea of always working on a room and saving some projects for later down the road when I want the space to feel refreshed.

Now even though this was the perfect couch for us there are still some cons. Most of which I knew ahead of time from reading reviews so it wasn't a total surprise. The couch being modular is a double edged sword. Because on one hand it's awesome to move everything around however we want but on the other hand things can move around when you don't want them too. So there's inevitably always a space between the couch pieces just big enough for the remote or your phone to fall through. There's no locking system on the individual pieces to attach them to each other which is annoying but that's a super easy fix. Personally we're going to use scrap wood to attach the 3 main pieces together from underneath and leave the ottoman floating. If you wanted to quickly and easily detach the pieces I would use a sliding bolt lock like this. The only other major con is I don't believe this was scotch guarded so you should do some kind of protective spray. We still have not, whoops! Again, each of those issues is fixable and knowing about it ahead of time meant we weren't disappointed. It's super comfortable and overall we love it!
I also like that we can easily rearrange the seating to make more room if people visit. On a day to day basis we have it in the square formation because it feels like a cozy movie watching day bed. But if we ever have people visit we can move the ottoman so that it's an L shape and add seating on the other side of the coffee table so there is instantly way more seating options.
Project #1: Built in cabinets.
After changing the layout of the room and moving the TV out of the corner by the fireplace I realized it would be really cool to have built in cabinets on either side. Mostly as a way to have some hidden storage for things we need but are not cute and don't want in plain sight like my yoga mat, blocks, extra extension cords, wires and such. Also I love the idea of adding floating shelves above this to have a whole wall of storage (but that's a project for future emily).
So to be clear, I don't know anything about building cabinets or how to properly do any kind of woodworking. Sure I've built things but I still don't really know what I'm doing and I kind of go into a lot of projects winging it. For this I watched a lot of videos like this and this or this. But I think this was the most helpful for coming up with a plan. Even though it's for an entertainment center it was super helpful. Here's the basic components of the structure I figured out from all the videos.
1. a small base
2. basic shelf frame
3. inner braces
4. face framing
5. cabinet top
6. baseboard trim (optional)
7. cabinet doors
Most of the videos and blogs I read use plywood to cut down to size but since my cabinets are going to be super skinny it was easier for me to use 8 inch boards. Also, I want to point out that I made this entire cabinet using a small hand saw, a power drill, a hammer, and wood glue. Every video I watched used much more elaborate equipment. Which yes, absolutely, it would have been much faster and easier if I had that equipment but ya girl is cheap and I was not interested in purchasing tools I may or may not use again and also the point of this was to save money by making it myself.

Now it wasn't all smooth sailing. I had one major issue which I found out after I build most of the cabinet and that was the space I was putting it was not even. So when I went to glide the cabinet into it's space it wouldn't move because the front measured 33 inches but the back measured 32.5 inches *silently cries. If I was more talented at woodworking I guess I could have built the cabinets at a slight angle or made it smaller and extended the face frame so it looked larger. All of those things were impossible at the stage I was in so what I had to do was chip away at the wood until it fit into place. And also kick and shove it into place with a rubber mallet and at times my foot until in position.
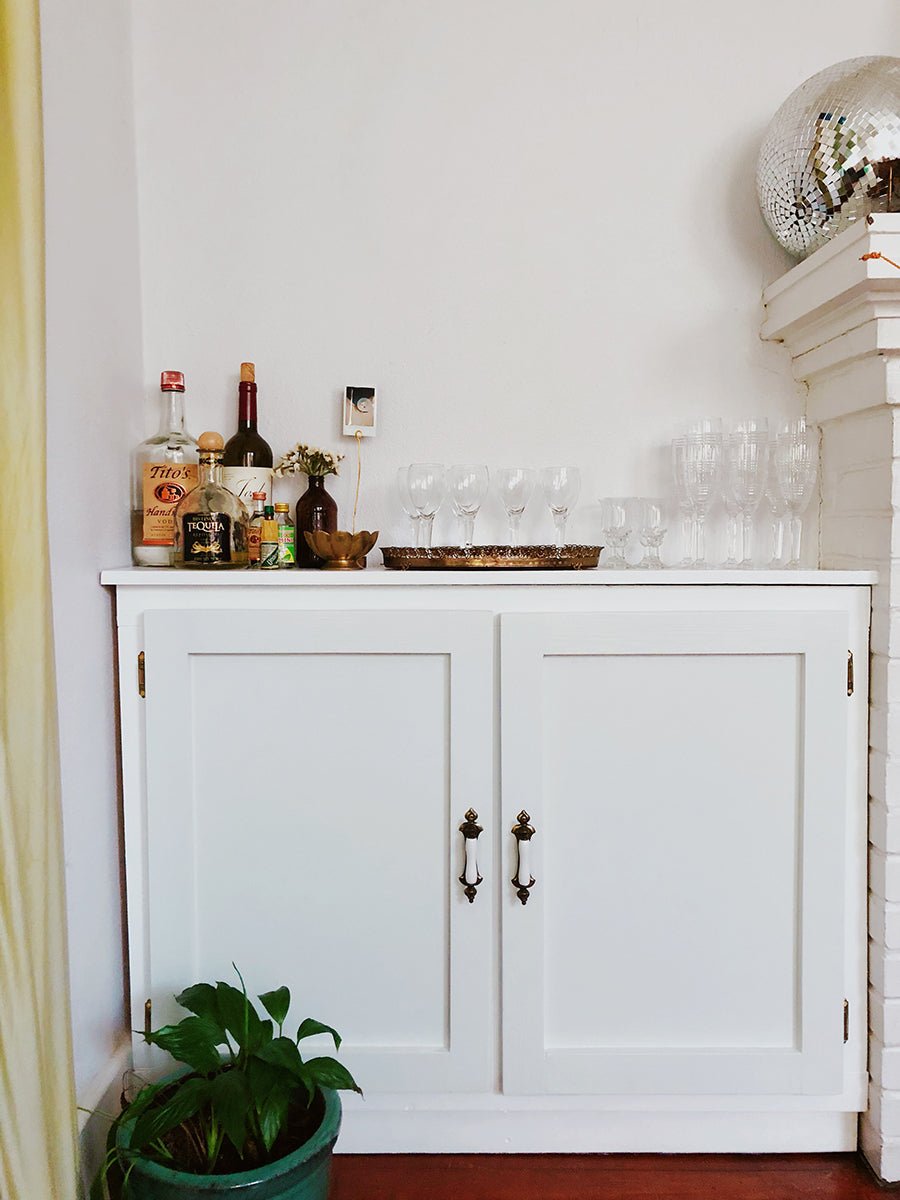
I finished the cabinets by painting it a glossy white and sanding in between coats.
Making the doors for this project was really simple. I used 1/4" mdf boards and the same 3" whiteboards I used for the face framing to create a shaker style cabinet. First by gluing and clamping everything in place and then after it dried going in from the back and adding in small finishing nails to make sure everything stays together really well. I used the same white glossy paint, sanding in between each coat. Or so I thought, the paint is just a shade off and I was so frustrated with this process that I still haven't looked for the correct can of white paint to fix it.
Next came the part that I did not think would cause me such a headache and that is trying to find the correct hinges. Y'all who the heck knew hinges were so complicated. (probably an actual woodworker *eyerolls at myself). After lots of research and watching many youtube videos I essentially have no knowledge to share with you and I'm more confused than when I started so my only advice is to ask someone else. Actually I will say the strong hinges seem to be the hidden (european?) style hinges. But the catch is that they're expensive and require you to cut into the doors and cabinet so that they fit into place and that made me extremely nervous. So my solution was to silently panic about how dumb it is to go into a project not knowing what you're doing until I went to an antique store one day and found amazing vintage hinges that were $1 each and seemed incredibly sturdy. This is partially why this project has taken so long. Not everyone tells you in their tutorials the length of time you'll spend silently panicking about how the project will turn out.

Speaking of panic, during one of my nightly Etsy scrolling sessions I happened upon a completely gorgeous set of vintage cabinet pulls from the 60's and there was only one of them and I was like clearly vintage cabinet pulls are in really high demand right now with the pandemic and all so I have to buy these IMMEDIATELY. What's even funnier is when they arrived I was like why do these look so familiar and then one day I was like wait are these the same handles from my grandparents bathroom?? My mom confirmed they look very similar. I haven't been in that house in years but somehow my brain was like you need these drawer pulls because...memories, I guess?
Anyway, this is probably one of my proudest diys. I think they came out so good and professional looking!

Project #2: Curtains
I bought these from Amazon and then at the last minute was like I should paint them to better match the curtain rod! I layered several different colors until I was happy with the look and then added a couple of layers of clear sealer.

The "curtain rod" is actually just PVC pipe that I spray painted cobalt blue. It was a super easy hack. The center hook is just a basic white hook from Home Depot that I painted blue to match everything.
The curtains themselves where quite the experiment. Because I'm a hoarder, I happened to have a lot of top sheets. I went through and picked out 5 that would be long enough to give me nearly floor to ceiling curtains. I only need 3 for the finished project but I used extra in case I didn't like the way they turned out. Working in batches I dyed all 5 sheets with turmeric. Again, I kind of went into this project not really knowing what I'm doing but willing to be ok with whatever the outcome was. There is lots of information about natural dying and there wasn't really one particular website that stood out to me so I would just do your research. There's lots of different information based on the size of your project, type of material, and what type of natural dye you're using (spices, vegetables, teas, etc). Because the sheets are so bulky I decided to use a large metal tub that I put in the bathtub so it would be easy to drain and rinse when It was ready.
Before you lecture me about natural dying and what I did wrong here, I want to say I liked experimenting and I love the results. I know I should have probably prepped the fabric differently and there's a science to natural dying. I did what I wanted to. Ok so first I heated up a medium pot on the stove of boiling water and added a decent amount of turmeric. Then I let it simmer for about 10-15 minutes, I don't know if this actually did anything to help but whatever. While that was going I prepped my sheets by rinsing them in lukewarm water before going into the dye bath. I think this helps the dye spread better on the fabric. I used 1-2 sheets at a time in the tub because they're so bulky I was afraid the dye wouldn't evenly take if there was too much fabric in there. I added the hot turmeric water to the tub followed by several kettles full of boiling water. Then I read somewhere white vinegar helps it take the dye so I poured a bit of that in there and let everything sit for a few hours. I checked on it every 30 minutes or so to turn the fabric around using tongs. Then I rinsed the sheets in cold water until it ran clear and then washed in the washing machine. The color was a toss up, everything was much softer than I was expecting. The white sheets turned buttery instead of a deep bright sunshine yellow like I would have thought. Most of what I read with natural dying is that you have to be flexible and open to whatever happens because it seems pretty hard to control the outcome.

Out of the 5 sheets I picked my 3 favorites and ripped them into 4 even sections. I then decided what color orientation I wanted the fabrics to be in and then sewed them together using a serger so there was a clean seam. Then I did a rolled hem on all of the exterior edges and the curtains were complete! I used curtain rings with clips so there was no need to add loops or grommets to the fabric itself.
HOT TIP: the curtain rings kept getting stuck on the PVC pipe and were not pulling smoothly. I put a call out on Instagram for help on how to resolve the issue and someone brilliantly pointed out I should use wax which totally worked! Bonus, I used wax from a king cake scented candle so my living room smells amazing now.


That's it! I hope you guys love the way the living room turned out because I sure as heck do! It's way more comforting to sit in this room now. There's still a few projects I want to work on like adding some floating shelves above the built in cabinets. Add some new art work into this room and change up the styling. But for now I am just so happy to sit and relax in here. Let me know what your favorite part is in the comment section!
-Em